The Problem and the Idea
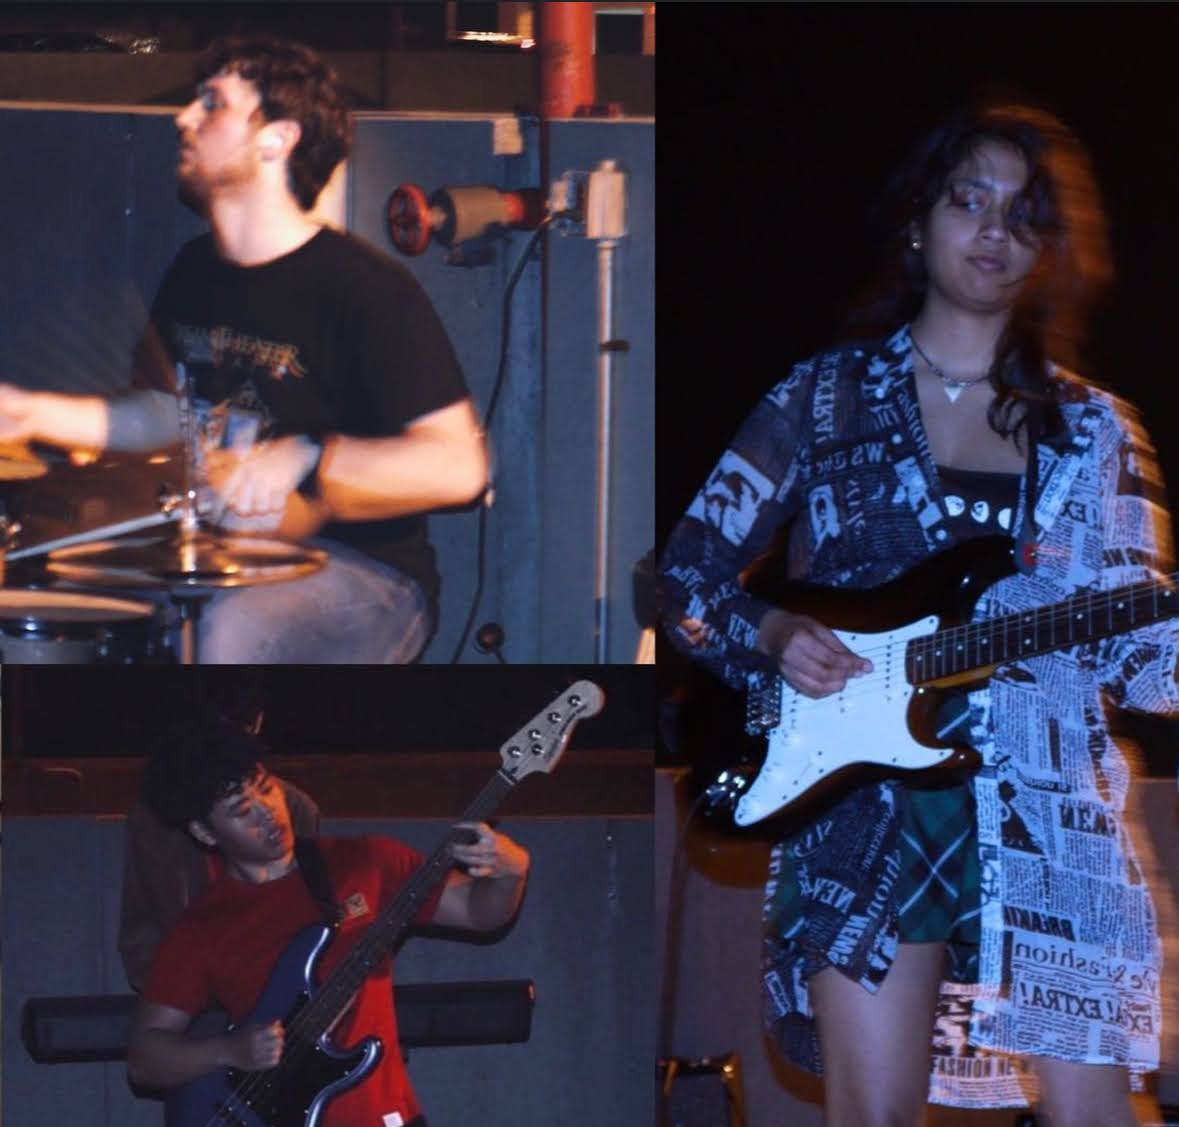
As someone who's been involved in a band, I've been made acutely aware of the bulk and setup overhead involved with running a live gig. This includes but is not limited to:
- Lugging around two cars worth of amps, pedalboards, synths, cables, etc.
- Plugging in a rats nest of cables
- Repeatedly yelling at guitarists to turn their amps up and down.
- The real life version of binary search (but for gain staging)
Getting everyone plugged in and set up + bashing out a competent mix requires some inhuman amount of patience and speed. As a musician and engineer, I felt that there had to be a way to optimize this workflow. The somewhat straightforward solution is to plug into a single mixer board and run everything through a PA. This improves on some aspects of setup. A consolidated control center and patch bay can improve the speed of achieving a competent mix. However, many challenges associated with gain staging, effects, and parameter recall aren't really solved until you start getting into the realm of expensive digital mixers. So, I had an idea. I am working alongside some of my fellow band members to bring to life an economical, digital mixer with an AI powered auto-mix algorithm to streamline setup. What does this look like in design? Keep reading, and I'll explain the details.
Form Factor
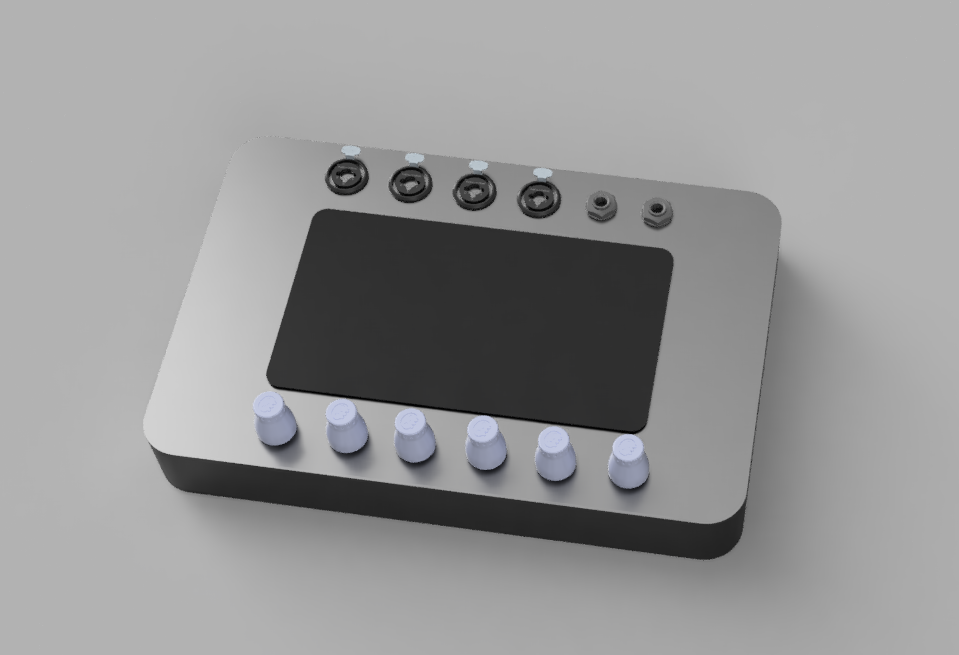
This is an early mockup of what the device might look like. It's optimistically slim and features touchscreen control, a plethora of inputs, and knobs for gain/volume. It follows a conventional form factor for digital mixers. However, future iterations may eliminate physical control entirely.
The vision we had was to control the mixer through an app connected over LAN. This is a standard industry practice, however it's only found in high-end, static setups located in concert venues. It's our vision to bring this to something with a smaller, mobile form factor. This will enable the band's engineer to make mixes on their phone or tablet from audience perspective, which is crucial to a pleasing and speedy mix. Without wireless control, the engineer would have to repeatedly make trips between the audience's position and the mixer board.
The board I/O may be iterated upon in the future. We've seen mobile mixers on the market with convenient AUX ins and Bluetooth I/O. This allows the band to easily incorporate backing tracks into the performance.
Mixer Architecture and Part Selection
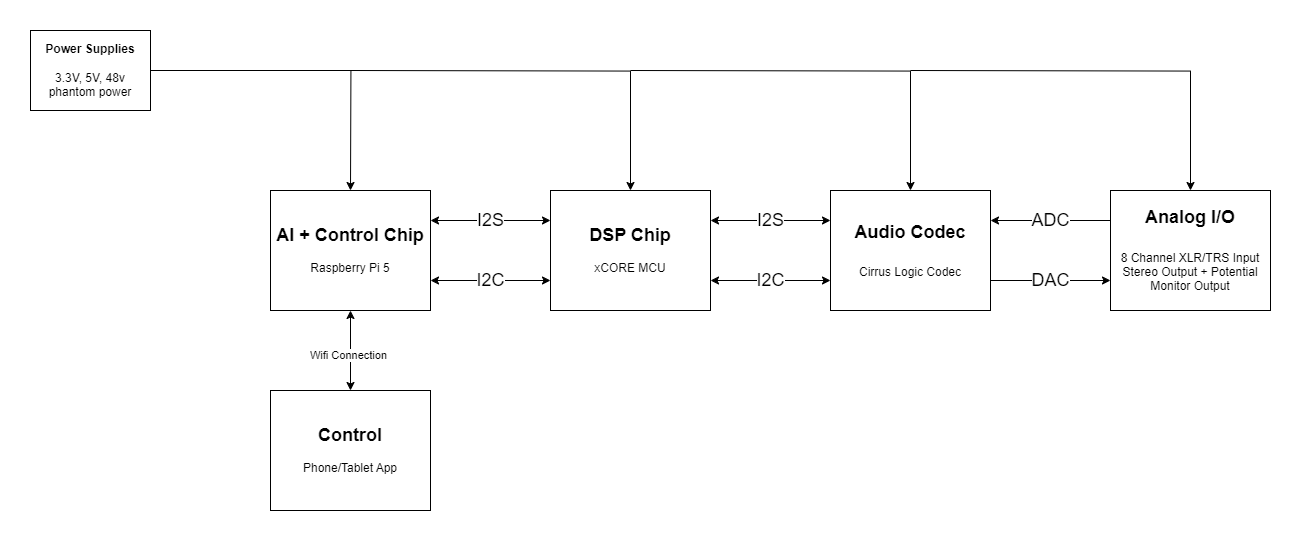
Here's a block diagram of the mixer. Most of it falls under the category of 'reinventing the wheel.' Communication between components is handled by I2C and I2S for control signals and audio streams, respectively.
Microcontrollers
The most unconventional design feature is the use of a Raspberry Pi SBC in combination with an xCORE microcontroller. We originally intended to use just a Raspberry Pi for all DSP, control, and AI purposes. However, we quickly ran into hurdles with its IO and the multi-threaded nature of the project. With ~8 streams of audio, the 4 cores of the Pi would run us a huge challenge of parallel processing. No semaphores and locks for us today, thanks.
With that in mind, we took a look at what the industry uses and came across the XMOS xCORE line of microcontrollers. The selling point of the xCORE MCUs is its extremely multi-threaded nature, with MCUs available in up to 32 core configurations. This would be ample for our DSP purposes. We decided to keep the Pi around, partly because we had it, and partly because it would make our life easy in terms of smashing together a usable GUI and running our AI model. If this product ever makes it to production, we would probably port over the AI capabilities to the xCORE (with their new line of chips featuring a dedicated vector ALU!) and control to a STM32 chip or something similar.
Electrical Hardware
The hardware of the mixer needs to handle two main tasks, amplication and conversion. I'm currently working on a prototype microphone preamp, and I will write up on it soon. Preamp design is nifty! I'm basing my design off the Analog Devices SSM2019 amplification IC.
Auto-Mix Feature
One of the novel features we envisioned was an AI-powered automix feature. The workflow would go something like this:
The band engages and configures the auto-mix function, selecting genre and whether or not creative effects should be applied. They then plug into the board and do soundcheck, playing through a section of their song. After that, the board spits out a mix configuration, setting levels, doing basic EQ, and applying genre appropriate effects, if desired.
Below are the main components of the workflow/software. We'll get into the software below.

The essence of the mixing software can be broken up into two stages: classification and algorithm. Let's walk through them.
Classification
In order for the algorithm to work, we need to figure out what types of instruments and sounds are connected to all the inputs, just like a real mix engineer. Is it a screaming lead guitar? Is it a smooth pad? Is it a lead vocal? Knowing such classifications is essential to a mix done by a real engineer and will be crucial to the algorithmic portion of our mixing feature as well.
Classification: Overview and Challenges
One of the main challenges is figuring out what categories to classify sounds into. To achieve the granularity that a real mix engineer could pull off would require an unthinkably large volume of training data. Also, as admittedly amateur engineers, we may not even be able to envision all of the niche, wacky sounds that people might feed through our mixer. To get past this problem, I had to put on my thinking cap and draw some generalizations about how mixing works. Let's take a crack at it.
Fundamentally, mixing is about fitting sounds in a finite space composed of frequency and position/panning (if in stereo). This is in part due to a psychoacoustic effect known as frequency masking. If two sounds of similar frequency are played at the same position in space, they will "mask," producing a muddy, unpleasant result where neither sound is heard particularly well. In order to unmask two sounds, you can mold the frequency spectrum of one or both sounds so that they are moved out of the way of each other in the frequency domain or you can physically move them in space so they are no longer on top of each other.
Using this knowledge, it makes sense to classify sounds based on their frequency rather than their specific identity as an instrument or noise. With that, we can build a set of training data with many fewer categories: low frequency/bass, mid-range, and high-range. These categories will make up one dimension of the classication.
There is another facet of mixing that informs the classification categories. This facet is not so rigorously defined. I like to simply call it "distance." If you envision a song as a performance on a stage, you have several "layers" of performers at different distances from the audience. You have the lead layer, which includes the lead vocalist and any solo instrumentation. They stand up front on the stage. You have the backing layer, which includes most of the instrumentation, particularly the rhythmic elements. You can envision them playing behind the lead vocalist and soloists. You also occasionally have a distant layer, which may consist of faint background vocals, buried ad libs, and ambient, atmospheric noises. In each mix, you have to place elements in each layer depending on their role in the arrangement. The classification model must do this as well. Thus, we have one more dimension of classification consisting of three categories, lead, backing, and distant.
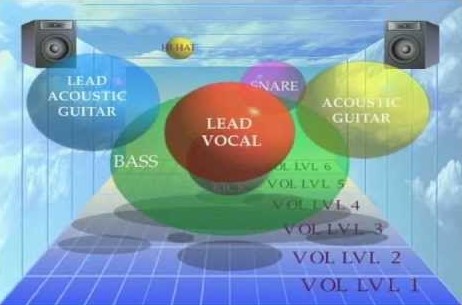
There's an old YouTube video on mixing that summarizes these concepts well with its thumbnail. Here it is for a bit of a visual representation. Think of the x axis as panning, the y axis as frequency, and the z axis (depth) as the distance.
If you do the math, that's 3 * 3 = 9 classes which we have to collect data for. That's so doable! However, we may still have to introduce some extra granularity, especially if we plan on introducing the ability to automatically configure creative effects. For several common instruments (e.g. electric guitar, bass, etc.), we may actually train the model to recognize the specific instrument. That way, we can apply appropriate effects based on the user-selected genre. If the performers want to play alt-rock, we can apply a healthy dose of distortion to the lead guitars. If they want to play something psychedelic, we can put a hazy flanger and huge reverb on the midrange elements. The next section will go into more detail, but this is the basic justification behind finer granularity in the classification of instruments.
Classification: AI Details
So, how are we actually going to acquire data and set up training and execution of our classification model? Let's begin with data gathering.
For prototyping, I stumbled upon a gold mine of data: Logic Pro's included loops and sample packs. For the uninitiated, Logic Pro is a popular DAW (Digital Audio Workstation) from Apple. It comes bundled with thousands of loops and samples, intended for music producers to make their next big hit. I am going to repurpose them for our model training (Note: We would probably get sued to oblivion by Apple if we were to put this mixer into production with Logic Pro training data. Again, this is just for the prototype). As a proof of concept, I was able to cobble together over 700 different audio files across 5 categories and use them to train a miniature classification model.
Speaking of the model, how are we going to architect it? It's relatively simple. First, we must convert our audio training data into a visual representation. We do that by creating spectrograms of our audio data,
which plot frequency over time. In order to optimize this presentation, we will also use the Mel scale instead of the normal frequency scale (Hertz). The Mel scale differs from the normal frequency scale in that its values scale linearly according to human perception of pitch.
This is unlike the logarithmic frequency scale, where a doubling of frequency results in a shift of one octave. So, a jump from 1000 Hz to 2000 Hz produces the same pitch difference as going from 2000 Hz to 4000 Hz. Meanwhile a jump from 1000 mels to 2000 mels is
the same as a jump from 2000 mels to 3000 mels.
Scaling our spectrograms in this linear fashion will give us a better visual representation of audio, leading to better results through visual AI analysis.
Below is a sample of a mel-spectrogram I generated for my demo audio classifier:
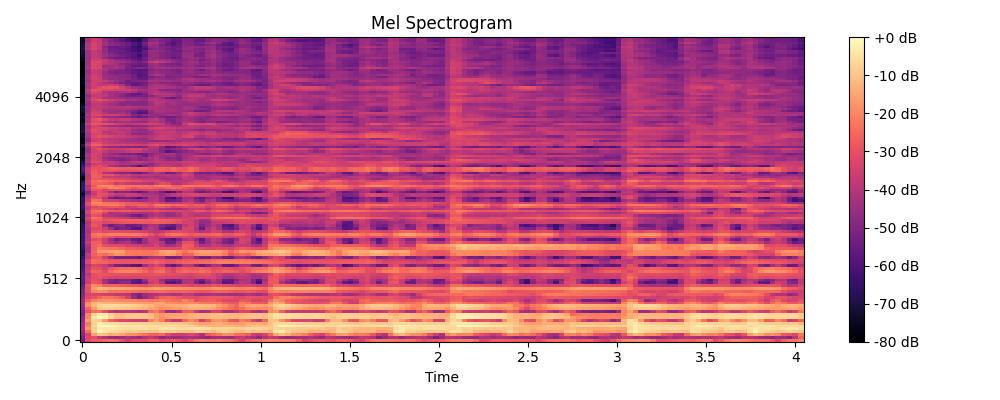
You may notice that the y-axis is labeled with "Hz." The actual spectrogram is scaled according to the mel-scale, but the labels are logarithmic and offer the equivalent frequency in Hz.
Given that this is now a visual classification problem, anyone familiar with AI will now guess that the obvious solution is a convolutional neural network. I'm not really enough of an AI nerd (yet) to fully explain a CNN, but just know that it is (was? up until transformers came along) the de-facto method for classifying images. The aforementioned model I trained is a CNN made with Python and the FastAI library. The FastAI library is essentially a simple wrapper over PyTorch. I loaded my 700 pieces of data and trained a model. For CNNs, the FastAI library defaults to performing transfer learning on the pre-existing RESNET (18 or 34, I'm not sure) model. It delivers fantastic results, with a validation accuracy of 90 percent! Check out the model at the link below.
Is this what our final model is going to look like? Not exactly. For one, we need something that runs well on embedded systems. PyTorch isn't going to cut it. In my research, I discovered Google's YAMNET audio classification model. It operates off the same principles as my demo model, but is much more robust (with about half a million parameters). It deliverered over 500 classes of granularity and native support for Tensorflow Lite, an embedded AI platform supported by both our Raspberry Pi and XCORE MCU. It was almost perfect for our needs! Given that we don't need all 500+ categories, we will have to utilize the feature extration to perform some transfer learning and narrow down the categories. Also, we wish to introduce the aforementioned classification dimensions of frequency and distance.
Algorithm
Now that we have sounds classified by their frequency content and arrangement distance, we can work with the algorithm to position them in our mix. There are three main aspects to this algorithmic process, volume, space, and creative effects. Let's walk through each of them.
Algorithm: Volume
In its most basic form, the algorithm simply normalizes the audio streams to an appropriate level and pans it appropriately if operating in stereo. For example, if we have a lead vocal (midrange, lead layer), then we simply normalize it to our "lead" volume (let's say -6dB) and pan it center. If we have a rhythm guitar, (midrange, backing layer), then we normalize it to our "backing" volume (let's say -9dB) and pan it left to avoid frequency masking with the main vocal.
One of the main challenges with this approach is perceived volume. Decibels are simply a measure of power, and humans may perceive multiple sounds as being of different volume even if they have the same decibel value. Thus, even if professional song mixes sound similar in their balance, the decibel values for each mix element may vary drastically between songs. This is why we have audio engineers in the first place! If you could normalize every element to the same volume, apply some generic effects, and call it a day, they would be out of a job.
Fortunately, there is some existing research in this area. Izotope, a music plugin company, makes a plugin called Neutron. It's an auto-mix plugin that does essentially what we are trying to do. They have done research into both perceived loudness and frequency masking, and I am reading into their literature to hopefully implement a viable solution for our prototype. I will update this post as I learn more.
With all that said, this algorithm is plenty useful even if it doesn't get the balance spot-on. The bulk of the overhead is associated with cabling and gain staging. With our rough volume algorithm, the mixer will already be able to spit out a configuration that allows the mix engineer to focus on fine-tuning the balance as well as the more creative aspects of the mix.
Algorithm: Space
Another aspect of placing a sound appropriately in a performance is a sense of space, i.e. reverb. Mix elements must have an appropriate amount of reverb added to them based primarily on their distance classification. Depending on the genre, lead and backing elements may be equally reverb-y, or one may be more reverb-y than the other. Distant elements will have the greatest amount of reverb applied to them. Low-end elements should never have reverb applied to them, no matter the genre. This is due to psychoacoustics: Humans are not good at perceiving space with low-frequencies, so any reverb in the low-end simply eats up space in the mix, making it muddy and hard to work with.
One note: "amount" of reverb is slightly imprecise. More technically, it can be defined as a function of both reverb volume and reverb tail length. Volume is pretty self-explanatory. Reverb tail length is the amount of time it takes for a sound to fully decay in a space, usually quantified by a RT60 value (the time it takes a sound to drop by 60 dB). Larger spaces produce larger reverb tails. The amount of reverb an instrument needs largely depends on how "smooth" its volume envelope is. Percussive elements take better to loud but short reverbs that don't mess with their quick, transient strikes. Smooth pads and lead guitars take better to long reverbs that induce a sense of ethereal space.
In summary, the space aspect of the algorithm works in tandem with the volume aspect to produce a layered performance with clear delineation between lead elements and backing elements.
Algorithm: Creative Effects
One of the stretch goals of this algorithm is to assign genre-appropriate creative effects. This is less of a technical feat, but requires extensive knowledge of mixing conventions across musical genres. It's our vision to be able to automatically apply distortion, flangers, delays, and other effects to appropriate instruments in the mix.
That's it.
That's all I have for now. I'll be updating this blog with updates as the project progresses. Stay tuned and feel free to message me about this project or anything related to music/tech!